This practical will introduce you to the GIS package which we will be primarily using on this module. ArcGIS Pro is a full-featured commercial GIS software package produced by ESRI (Environmental Systems Research Institute) that contains a wide range of tools for the management, display and analysis of spatial data.
In this practical you will learn:
How to locate and manage spatial data in ArGIS Pro
How to use the ArcGIS Pro interface
How to change symbols in ArcGIS Pro
How to measure spatial data in ArcGIS Pro
How to produce simple maps within ArcGIS Pro.
File management – Best Practice
Working with GIS can result in lots of files, often quite large. In order to manage your work, we are giving you some guidance on how to manage them.
You may find it useful to keep a copy of all practical workings so that you can revisit them for the assessments. Here are some general suggestions on how and where to store the work from your practical classes.
Create a folder for the module and ensure work from each practical is saved in a separate folder within that e.g. a folder called TRP216 and then other folders in that called Practical1, Practical2 etc.
Do not use spaces in folder names or file names you use for GIS. Sometimes this can cause problems with GIS software. Either use an underscore instead ‘_’ or leave out the spaces.
If copying work to a USB stick, the easiest way to do it is to copy a full directory, GIS data is often stored in several separate files or the same filename but with different file extensions. It is easy to miss one or more of them when copying individual files and this can stop the data from being accessed correctly by GIS software. If you need to email or transfer GIS data that is made up of several files another option is to sort the files by name and select all files, regardless of the file extension, with the same filename. These can be added to an email or better still added to a zip file first before adding as an email attachment.
Use meaningful file names when saving data. File names such as essay.doc or map.mxd do not tell you too much information about the file, particularly after some time has passed. Longer, more meaningful file names will help. E.g. TRP216_Individual_Report.doc or Practical2_SYAverageAge.mxd
Check your filestore to ensure you are not reaching the limit of your storage space. If you are you may need to archive older work and folders to a USB drive or a CD/DVD. It is also possible to save your work directly to a USB drive, you may find however that larger data files are slower to respond and load from these.
Make sure you save your work frequently.
Part 1: First steps with ArcGIS Pro
We will start by downloading the data for Practical 3 Part 1.
In your Week 4 Learning Materials folder, open the Downloads for week 4 page.
Download both data sets (Vector_layers.zip and MSOA_2021_Sheff_TS007.zip) by clicking on the three dots.
Open a folder to view the downloaded zip file. The files in the zip file need to be extracted so that you can access the data using the ArcGIS Pro software.
Large files!
Files used for GIS are often large so will often come in a compressed format. When you see files with a .zip extension, they will need to be extracted before you can use them with GIS software.
To extract a compressed file, right-click on the .zip file and select Extract… or Extract All…
Extracting the dataset
Right-click the Practical_3_Data_part1.zip file and select Extract All…
Extract the data to a suitable location for the module practicals, making a new folder if required. (Remember, if you are on the Managed Desktop to use your U: drive)
We will use the data you have downloaded to work through the remainder of this practical.
The Shapefile
Let’s start by simply having a look at the contents of the folder we extracted. This is a shapefile and is one of the most common file formats for spatial vector data. You can see that it is actually made up of several different files – this is important – and is why when you download a shapefile, you will always have to extract the contents first before you can work with it.
You also won’t be able to open any of the individual elements of the shapefile; in order to access the data in a shapefile, we need to use specialist software. We are going to use ArcGIS Pro for this module but there are many other tools that can also be used.
What is a shapefile?
A shapefile is one of the most common file formats used in GIS. It is actually a collection of files with a common filename. The individual components of a shapefile cannot be opened individually. To function, a shapefile must include:
.shp - The main file that stores the feature geometry; required.
.shx - The index file that stores the index of the feature geometry; required.
.dbf - The dBASE table that stores the attribute information of features; required.
Optionally, it may include (amongst others):
.prj - The file that stores the coordinate system information; used by ArcGIS.
.sbn and .sbx - The files that store the spatial index of the features.
Getting started with ArcGIS Pro
We are going to start by opening ArcGIS Pro and exploring the interface.
Opening ArcGIS
Open ArcGIS Pro from the managed desktop
Click on the blue The University of Sheffield button and use your University login and password to sign in. You will also have to go through MFA.
You should see an interface like the one below.
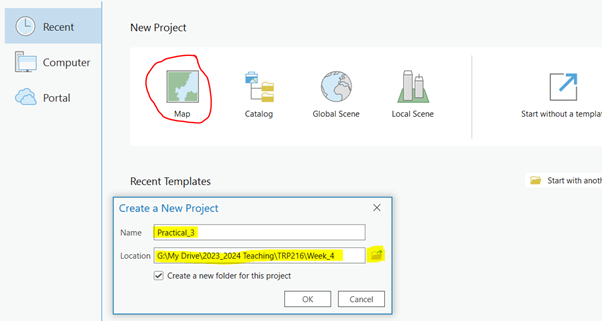
Create a new Map Project by clicking the ‘Map template’ icon, then fill out the dialog box to give the project a name and a location (I recommend a folder in your U: drive)
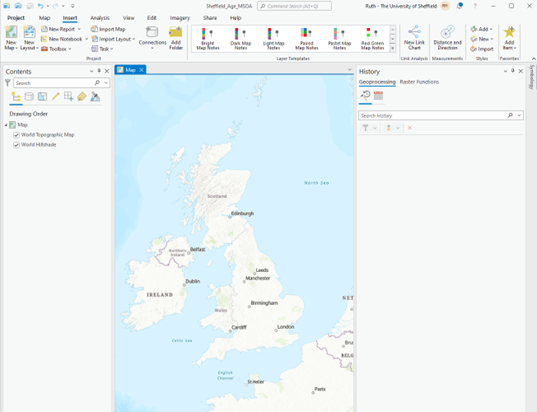
Your new map project should look something like the one below:
Exploring the ArcGIS interface
We are now going to explore the ArcGIS Pro interface.
Component
Description
1. Project menu
Provides access to application settings and other configurable properties.
2. The ribbon Organizes tools on a series of tabs.
These are context dependent so will change depending on the type of data being used, for example
3. The command search box
Helps you find and open geoprocessing tools and run user interface commands. You can also access help topics related to your search terms.
4. The Contents panel
Displays layers related to the active view, which may be a map, a scene, or a layout, for example.
5. Map and Table view
Views, such as the map in this example, are the primary work areas in ArcGIS Pro. Tables and scenes are also viewed here.
6. Catalog panel
The items in a project can be managed in the Catalog pane.